
Chatbots are everywhere today, from customer support on websites to virtual assistants like Siri and Alexa. But have you ever wondered how they actually work?
In this article, we’ll walk step-by-step through building a simple AI chatbot using Python, NLTK (Natural Language Toolkit), and a Neural Network built with Keras. By the end, you’ll understand the entire pipeline, from taking user input to generating an intelligent response using classical NLP techniques. The objective of this article is to give the reader a good understanding of the fundamental building blocks of natural language processing and to provide the intuitions on how chatbots work under the hood.
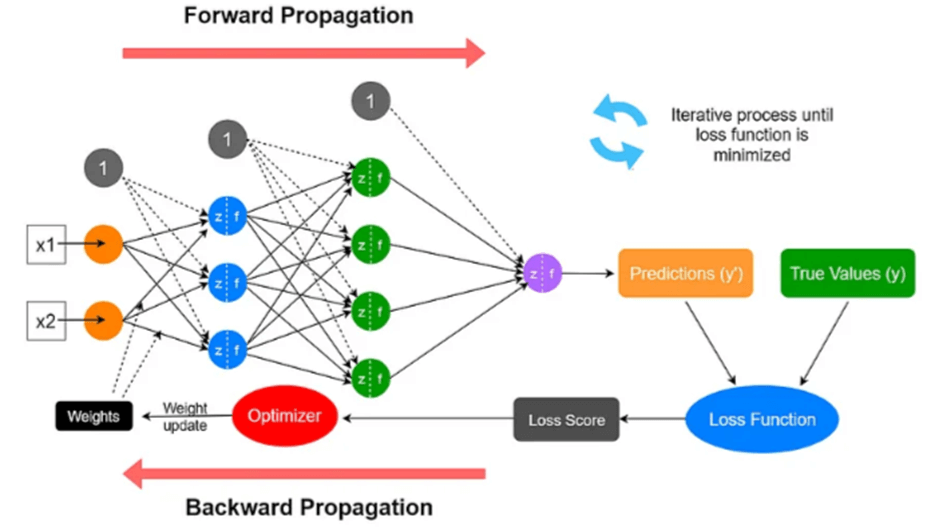
At a high level, chatbots follow a simple workflow to process user messages and provide meaningful replies.
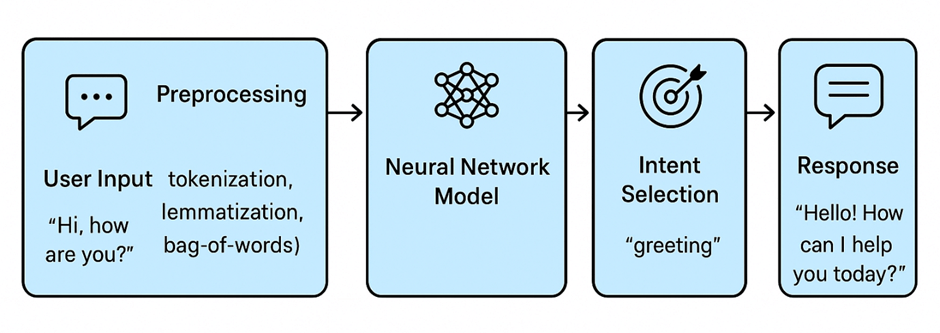
Chatbots follow a simple workflow to process user messages and provide meaningful responses. It all begins with the user input, such as typing “Hi, how are you?” into the chat window. This input is then passed through a preprocessing stage, where the text is cleaned and transformed into a format the machine can understand. Next, the processed data is sent to a neural network model, which has been trained to recognize different types of messages, often called intents (for example, greetings, small talk, or booking requests). The model predicts which intent best matches the input, and based on that, the chatbot performs intent selection to decide what the user is trying to achieve. Finally, the system produces an appropriate response, such as “Hello! How can I help you today?”. This step gives us a high-level view of how chatbots move from input to output, Now, let’s start building one step by step, beginning with the dataset that powers the chatbot.
Step 1: Creating the Dataset
The heart of a chatbot is its dataset, a structured way of mapping user inputs to intents (what the user wants) and responses (what the chatbot should reply with)
We use a JSON file (intents.json) to store this information:
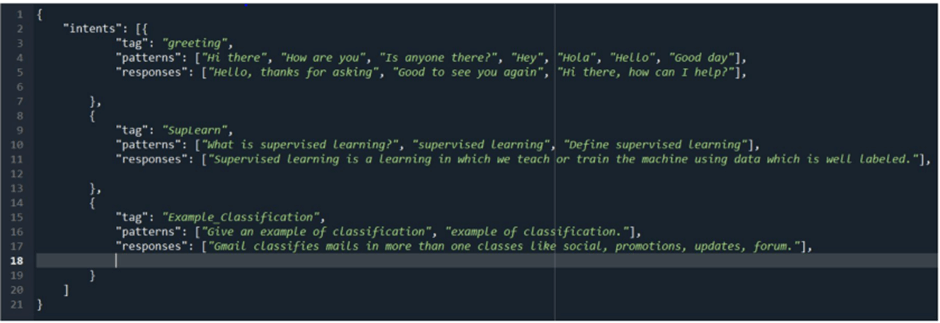
- patterns → example user inputs (training samples).
- tag → the intent (label).
- responses → what the bot should reply.
Think of this as a mini-training dataset for supervised learning. This is essentially a classification dataset for NLP.
Feel free to add your own intents, patterns, and responses to make the chatbot more useful for your specific needs. For example, you could create intents for booking, FAQs, or small talk. The more variety you add, the better your chatbot will perform in real conversations.
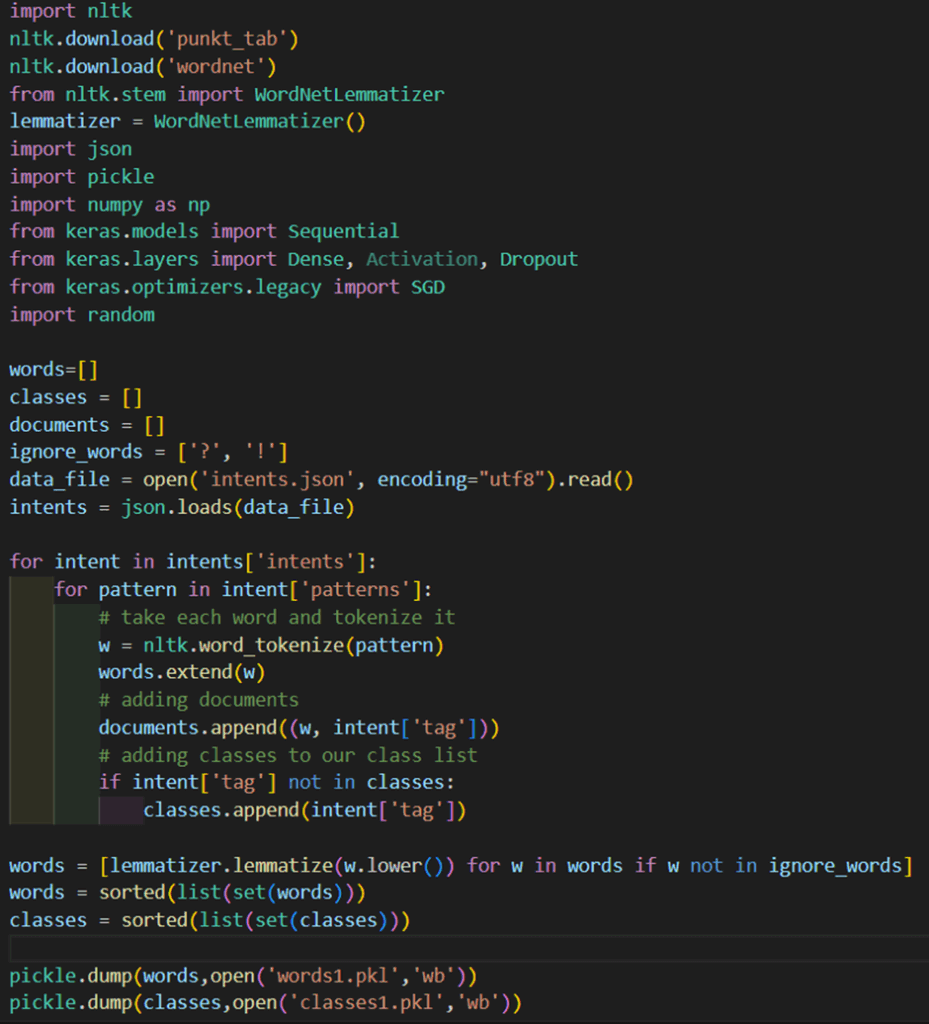
Step 2: Preprocessing the Data
Before we can train a neural network, the chatbot’s text data must be converted into numbers, since machine learning models can’t directly understand raw words. This preprocessing step ensures that different sentences are represented in a structured and consistent way.
- Tokenization – The first step is to break down each sentence into individual words. For example:
“Hi there” →[ "Hi", "there”]. - Lemmatization – Next, we reduce words to their base or dictionary form. This ensures that variations of a word are treated the same. For instance:
“running” → “run”.
So, whether a user types “run,” “running,” or “ran,” the chatbot can understand them as the same concept. - Bag-of-Words (BoW) – Once we have clean words, we represent each sentence as a vector. Each position in the vector corresponds to a word in the vocabulary, and the value is
1if the word appears,0if it doesn’t. For example, with a vocabulary[ "hi", "hello", "bye”], the sentence “hi” becomes[ 1, 0, 0]. - One-Hot Encoding Labels – Finally, we need to prepare the output side. Each intent (or class) is represented as a binary vector. For example, with intents
[ "greeting", "goodbye", "thanks”], the label “greeting” becomes[ 1, 0, 0].
By the end of preprocessing, both the input sentences and the expected outputs are converted into numeric vectors. This makes it possible to train a neural network on text data and ensures consistent understanding regardless of how users phrase their queries.
Code:
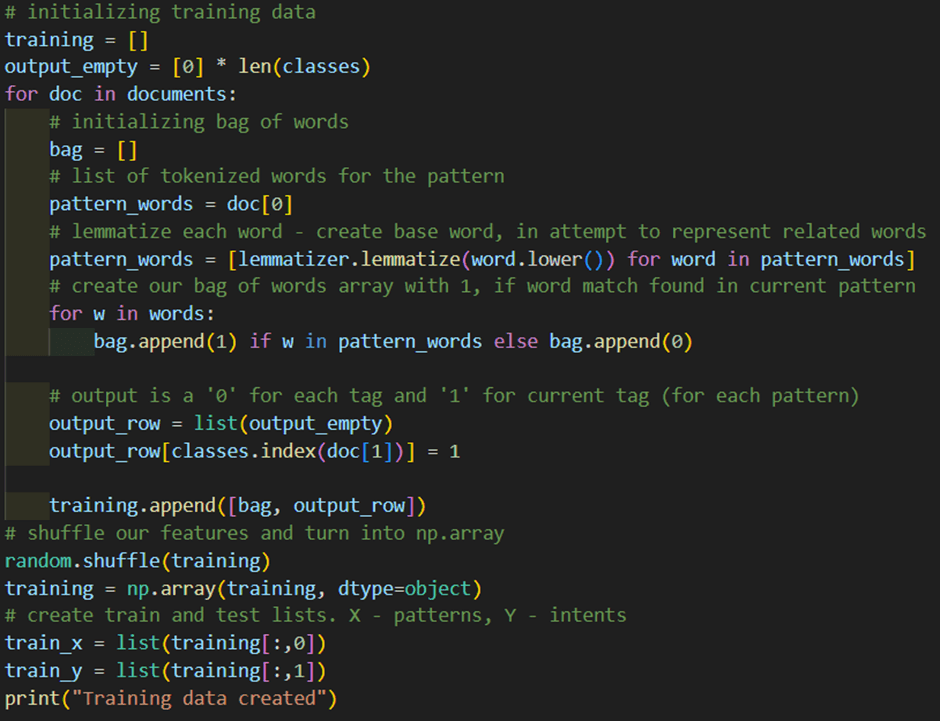
Step 3: Preparing Training Data
After preprocessing, we need to structure the data into a format that our neural network can understand. This means creating two key components:
- train_x – These are the input data, generated using the Bag-of-Words method. Each sentence from the dataset is converted into a fixed-size vector of 0s and 1s, representing the presence or absence of words from our vocabulary.
- train_y – These are the output labels, created using one-hot encoding. Each intent is represented as a binary vector where only the index of the correct intent is 1, and all others are 0.
This step is crucial because it gives our neural network structured data to learn from:
- train_x tells the model what the user said (in numeric form).
- train_y tells the model what intent that sentence belongs to.
Together, they form the foundation for teaching the network how to classify user queries.
Code:
Step 4: Building the Model
Now that we’ve prepared our training data (train_x and train_y), the next step is to feed it into a model that can learn the relationship between user inputs and their intents.
We are using an Artificial Neural Network (ANN) with Keras because the chatbot’s task is essentially a classification problem, it needs to classify a user’s input sentence into one of the predefined intents, such as greeting or goodbye. ANNs are well-suited for this because they can learn patterns in data and generalize beyond exact matches, meaning the bot can still understand inputs that aren’t identical to the training examples. This model is also simple and efficient, making it lightweight enough to run in real-time applications like web APIs. With multiple hidden layers, the ANN can capture non-linear relationships in the text, offering more flexibility than rule-based approaches. While more advanced models like RNNs or transformers could be used, a simple ANN can be used to demonstrate a practical baseline for building an intent-based chatbot.
Code:
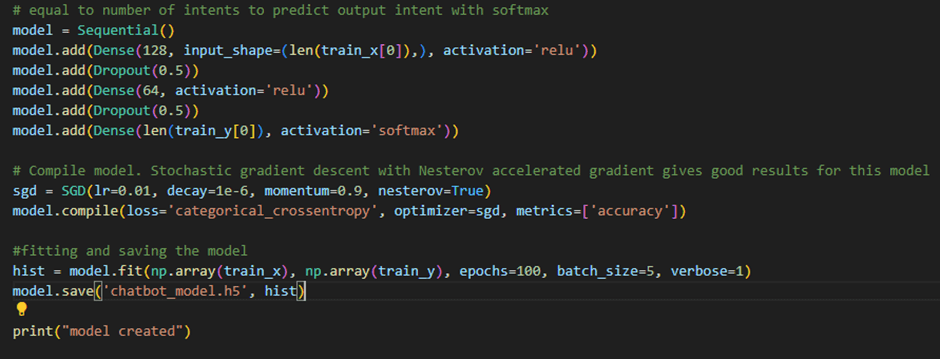
This architecture is designed to make the chatbot both accurate and reliable. We use the ReLU activation function in the hidden layers because it allows the model to capture non-linear patterns in the data, which is essential for understanding the variety of ways users can phrase their messages. To avoid the model simply memorizing the training data, we apply dropout, which randomly ignores some neurons during training and helps prevent overfitting. At the final layer, we use a softmax activation function to generate a probability distribution across all possible intents, ensuring the model predicts the most likely intent for any given input. The input layer matches the size of our vocabulary (based on the bag-of-words representation), the hidden layers learn meaningful patterns from the sentences, and the output layer produces the probability for each intent. For example, if the input is “Hi”, the model might predict {greeting: 0.95, goodbye: 0.05}, and since the highest probability corresponds to greeting, that becomes the final predicted intent.
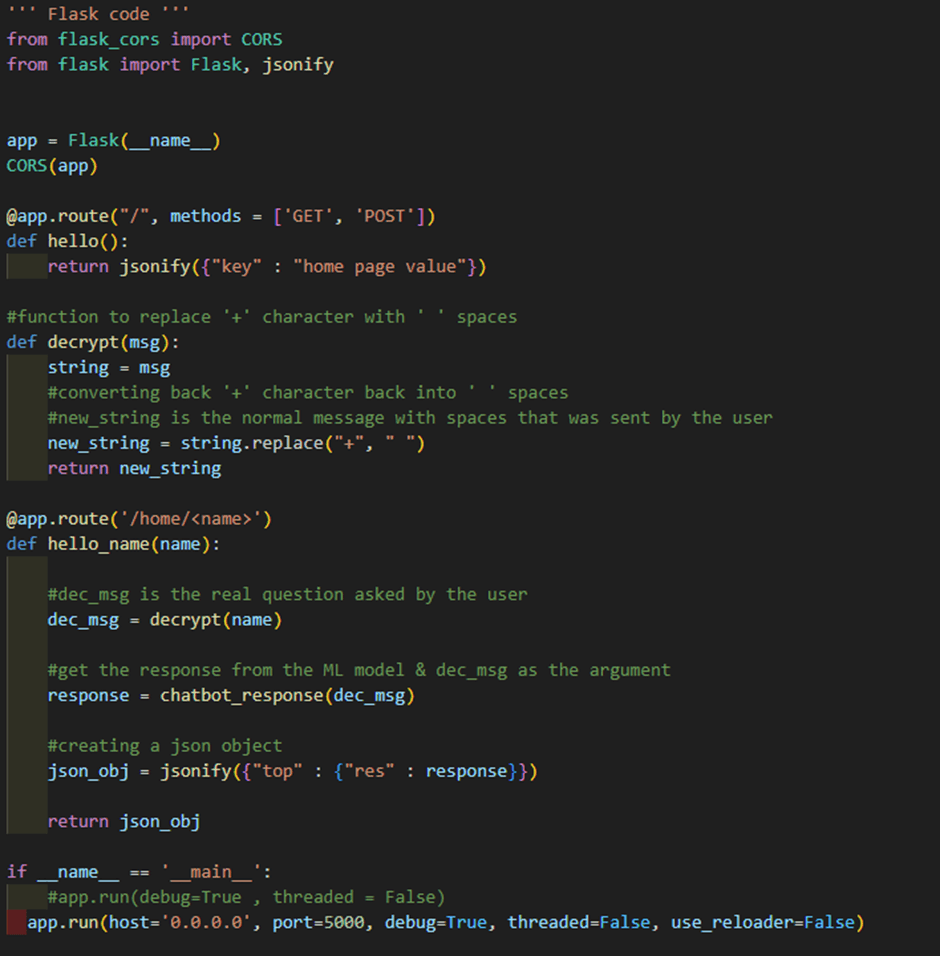
Step 5: Creating an API with Flask
Now that our model is trained, we need a way for users (or other applications) to interact with it. Instead of running Python scripts directly, we wrap the model inside a Flask API. Flask is a lightweight web framework that lets us create HTTP endpoints (URLs) which accept user messages, pass them through the model, and return the predicted response. This way, the chatbot can be accessed like any other web service, whether from a browser, a mobile app, or even another system. In short, Flask acts as the bridge between our trained model and real-world users.

Code:

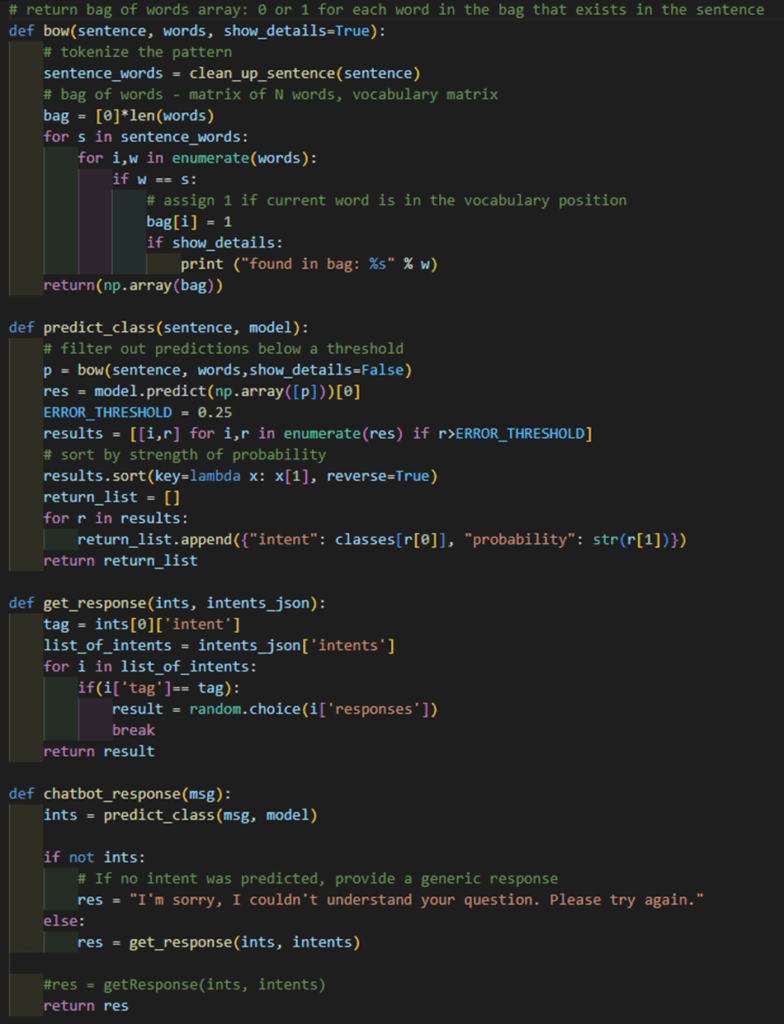
Step 6: Testing the Chatbot
Once the model is trained and integrated with Flask, it’s time to test if everything works as expected. Start by running the Flask app, which will launch a local web server on your machine. You can then interact with the chatbot by opening any browser and visiting a URL such as:
http://localhost:5000/home/Hi+there
Here, the text after /chat/ is the user input being sent to the chatbot. The backend receives this message, processes it through the preprocessing pipeline, predicts the intent using the trained neural network model, and then returns the corresponding response.
For example, if you type “Hi there”, the chatbot might respond with:
{ “response”: “Hello, thanks for asking”}
This confirms that the chatbot can take raw input from a user, classify it, and return the correct output in real time. You can experiment with different phrases to see how well the chatbot generalizes beyond the training data.
With this step, we’ve successfully tested the chatbot in a real-world setting, ensuring that it can process input, classify intents, and return responses in real time.
Conclusion
You’ve now built a complete chatbot pipeline, starting from designing a dataset of intents, preprocessing text with NLP techniques, training a neural network model, deploying it with a Flask API, and finally testing the chatbot to see it in action. Along the way, you’ve learned how raw text is transformed into structured data, how a model predicts the user’s intent, and how the chatbot generates an appropriate response.
While this chatbot is simple, it represents the foundation of modern conversational AI. With more data, advanced natural language models (like Word2Vec, BERT, or GPT), and integrations into real-world platforms (like websites, mobile apps, or messaging services), you can expand this into a powerful assistant that can handle complex queries and deliver personalized experiences.
The journey doesn’t stop here, every chatbot improves as it learns from interactions. By continuously refining the dataset, retraining the model, and experimenting with more advanced techniques, you can take your chatbot from a basic assistant to a truly intelligent conversational partner.
